In this post, You will learn how to redirect www to non-www or vice versa using 3 easy methods (Nginx servers included).
While many people myself included preferring shorter domains without www, many others prefer the www version.
However, this is not just a personal preference for all site owners. Some companies choose to use the www subdomain for some technical benefits.
If you are in doubt which one you should choose and want to learn the full story, make sure to check my post about www and non-www domains, their differences, and the history behind them.
But when it comes to SEO, there is no difference whatsoever between the two. You can’t go wrong with either one.
What is essential though, you need to configure your website properly and ensure the format you choose is constant throughout all your URLs.
If you have HTTPS already enabled on your site, make sure to force HTTPS on your WordPress website to prevent getting a duplicate content penalty from Google.
Step 1. Check Your DNS Configuration
Before you start, you need to check your DNS records and make sure your main domain and its www subdomain both points to the same server IP address.
This sounds more difficult than it actually is. You just need to use an online tool like DNS Checker to make a quick DNS lookup to verify your records.
In most cases, the correct DNS records will be automatically configured by your domain registrar at the time you bought your domain.
However, if any of the required records were altered or deleted, this verification will spot them.
Enter your domain in the URL field with www and without it and set the record type to A:
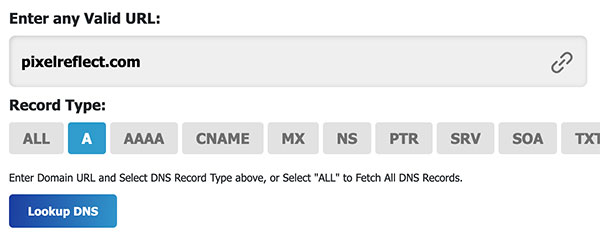
In the result section underneath, each domain must point to the same IP address:


What to do if DNS records are not configured correctly?
If the IP address mismatch or any of the records is missing, you need to add it from your DNS Zone manager.
There 2 possible configurations we can use. You can use either of them:
Configuration #1:
- An A record that points the main domain to your IP address
- An A record that points the www subdomain to your IP address
Configuration #2:
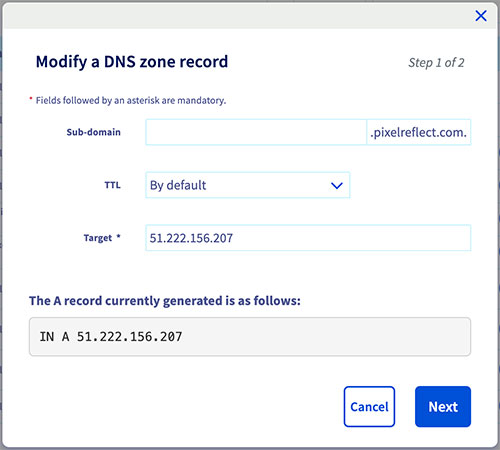
- An A record that points the main domain to your IP address
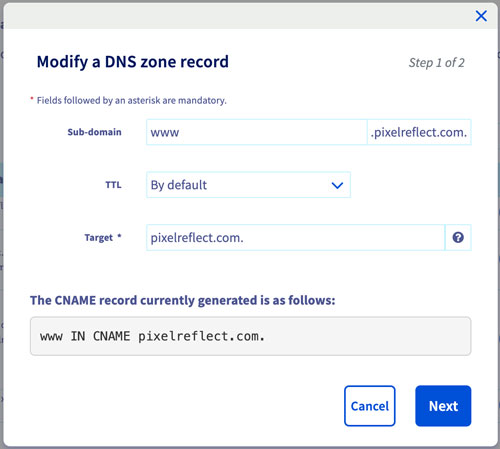
- A CNAME record that links your www subdomain to the main domain
I personally use OVHCloud to purchase and manage my domains so if you are using a different provider like Godaddy or Namecheap, the user interface in the below screenshots will be slightly different (in case you have difficulties, please Google how to add these records for your domain manager):
The A record configuration on OVHCloud
The CNAME record configuration on OVHCloud
Now that you have your DNS records set up properly, let’s move to the next step…
Step 2. Update Website URLs
Now it’s time to update your site URLs from the settings before adding the redirect.
You can choose to do this later but you will need to update the URLs from the database. Because after the redirect your site will be stuck in a redirect loop if you haven’t changed the URLs already.
So let’s do just that…
From the WordPress dashboard, go to Settings > General and either add or remove www from these URLs depending on your preference:

After you save, you will be logged out of your website as this change invalidates your login cookie.
Also, your site may be stuck in an infinite redirect loop until you complete the next step.
Step 3. Redirect from WWW to NON-WWW or Vice Versa
Method #1. Redirecting using cPanel
The first method is the easiest, but it requires having cPanel installed on your server.
First, log into your cPanel account.
From your cPanel dashboard, go to Domains >> Redirects.

Now depending on whether you want to redirect www to non-www or non-www to www, the configuration will differ a little bit:
Redirect www to non-www
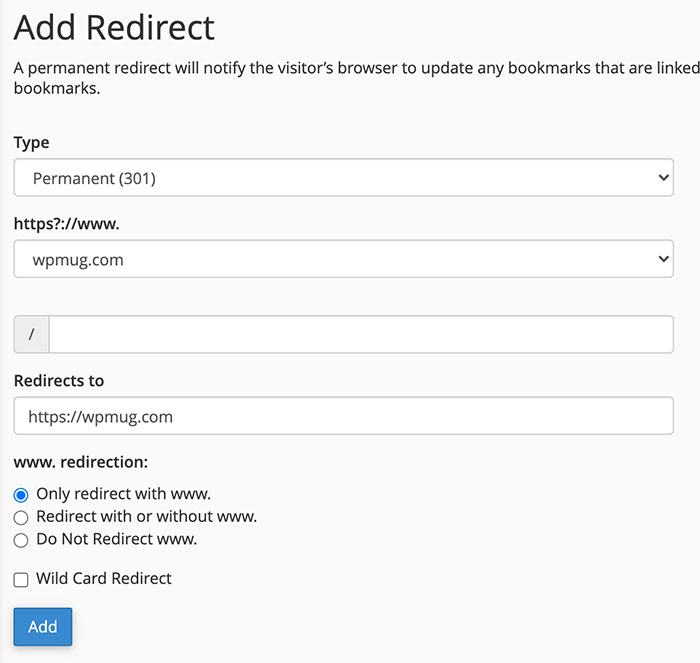
- Choose Permanent (301) to make the redirect has a 301 status code.
- Select your domain from the dropdown menu.
- Leave the textbox after the slash (/) empty.
- Enter your website URL in the Redirects to the textbox (no forwarding slash).
- Make sure you choose Only redirect with the www. option.
- Leave Wild Card Redirect unchecked.
Redirect non-www to www
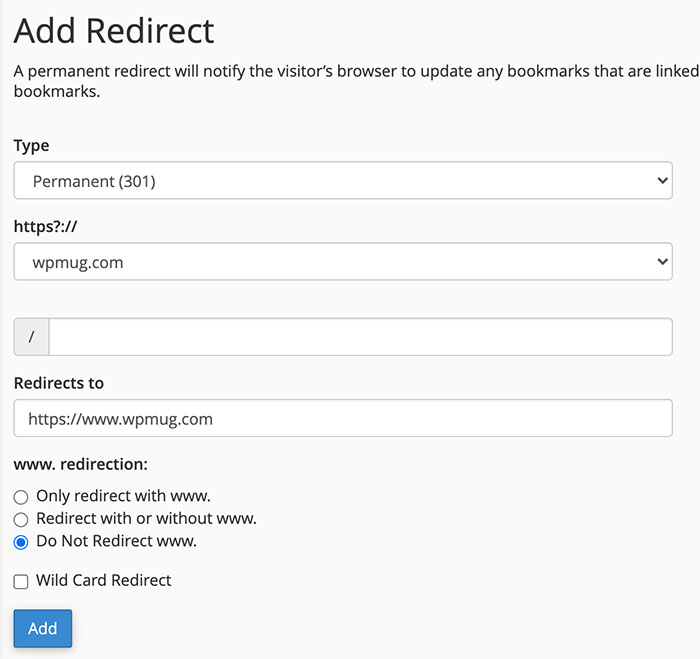
- Choose Permanent (301) to make the redirect has a 301 status code.
- Select your domain from the dropdown menu.
- Leave the textbox after the slash (/) empty.
- Enter your website URL prefixed with www in the Redirects to textbox (no forwarding slash).
- Make sure you choose the Do Not Redirect www. option.
- Leave Wild Card Redirect unchecked.
Method #2. Redirecting using .htaccess file
The second method is by editing the .htaccess file.
First, you need to open the .htaccess file using a code editor.
The file will be located in the root folder of your website (public_html for most users) and its name will be prefixed with a dot.
If you have cPanel, it is easy to open the .htaccess using the built-in code editor (right-click on the file and choose Edit then Edit again.
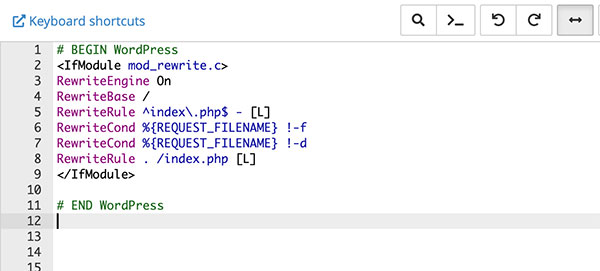
Redirect www to non-www
If you want to 301 redirect www to non-www, add the below code to your .htaccess file:
<IfModule mod_rewrite.c>
RewriteEngine on
RewriteCond %{HTTP_HOST} ^www\.example\.com [NC]
RewriteRule ^(.*)$ http://example.com/$1 [L,R=301]
</IfModule>
Replace example.com with your domain. Don’t remove the slash between the domain name and .com in the first example.
Redirect non-www to www
If you want to 301 redirect non-www to www, add the below code to your .htaccess file:
<IfModule mod_rewrite.c>
RewriteEngine on
RewriteCond %{HTTP_HOST} ^example\.com [NC]
RewriteRule ^(.*)$ http://www.example.com/$1 [L,R=301]
</IfModule>
Replace example.com with your domain. Don’t remove the slash between the domain name and .com in the first example.
How to redirect on an Nginx server?
If you happen to have an Nginx server instead of Apache, editing the .htaccess file will have no effect.
You will need to edit the Nginx config (.conf) files to add the redirect.
Here is an easy guide from DigitalOcean on managing Nginx server blocks.
The default location for Nginx config files is /etc/nginx/conf.d/
Let’s assume your server block (similar to virtual hosts in Apache) is inside the file example.conf.
You need to open this file using a code editor and add the code before the start of your server block.
Redirect www to non-www
To redirect www to non-www, your configuration file should look like this (don’t forget to replace example.com with your domain):
# Redirect www to non-www
# This is the code you need to add
server {
    server_name www.example.com;
    return 301 $scheme://example.com$request_uri;
}

# Your server block (already exists)
server {
    server_name example.com;

    ....

}
Redirect non-www to www
To redirect non-www to www, your configuration file should look like this (don’t forget to replace example.com with your domain):
# Redirect www to non-www
# This is the code you need to add
server {
    server_name example.com;
    return 301 $scheme://www.example.com$request_uri;
}

# Your server block (already exists)
server {
    server_name www.example.com;

    ....

}
How to fix “Too Many Redirects” Error?
If you get a “too many redirects” error (ERR_TOO_MANY_REDIRECTS on Chrome) after this, then most likely you didn’t follow the previous step to update your site URLs from the settings.
Now that you no longer have access to the WordPress dashboard, am afraid the only way you can fix this is by getting your hand a bit dirty with the database.
But don’t worry, I will show you exactly what to do.
If you are using cPanel, open phpMyAdmin then open your database. Also, you can use any other database management tool you have access to.
Select the wp_options table (the wp_ prefix might be different for you) from the tables list and you should find the home and siteurl fields at the very beginning of the table.

Hint: Double-click the option_value to edit the URL. Click anywhere outside or Enter to save changes.
That’s it, now if you go back to your website and refresh, it should work just fine.
How to Update Old URLs Included in Your Content?
If you have some URLs that were manually added to your content, then you need to change them too.
Even if you don’t, your site will be able to redirect them to the new ones automatically.
However, it’s better to update them in all occurrences at least for the performance benefits.
The easiest way to perform this task is to use a plugin like Better Search Replace which can replace your old domain with the new one in all database tables in one run.
Simply download the plugin from the Plugin directory and activate it.
Once the plugin is activated, go to Tools > Better Search Replace.
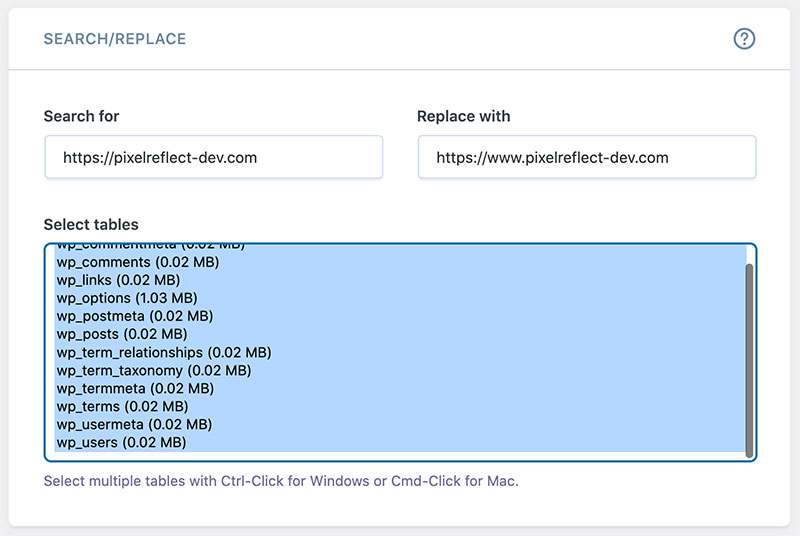
Now add your old website URL to the Search for option and the new URL to the Replace with option. Make sure to include the http/https part and remove any forwarding slash at the end.
After that, you need to select the tables you want to look into. In this case, I recommend selecting all tables.
Click Ctrl+A on Windows or Cmd+A on Mac to select all tables.
You should keep the Run as dry run option enabled for the first run.
Leave the other options to their default values.
Now click Run Search/Replace button.
The plugin now will search your database for all occurrences of your search phrase and give you a details table if you checked the dry run option without changing anything.
After you review the dry run table, feel free to click Run Search/Replace button again but this time without the dry run option enabled.
This will update any instance of your old URLs throughout the whole website.
The Origins of WWW in Domain Names (if Interested!)
The World Wide Web (WWW or W3 for short) as we know it today was invented by the computer scientist Tim Berners-Lee back in 1989 and released to the public in 1991.
While it is not required, web administrators back then used to host the Web part of their domains on the www subdomain to distinguish it from the other services they provide like FTP and mail. So each had its subdomain.
Also, in the early days of the internet, people were not accustomed to typing and clicking URLs. So prefixing the domain with www made it clear that it is a website address.
Eventually, the www prefix which started as a tradition faded away and non-www became the default.
Conclusion
Having a proper configuration to 301 redirect www to non-www or vice versa is critical to ensure your site users always end up visiting the same hostname.
When it comes to SEO, it is not essential whether you choose www or non-www. What is important is sticking to one hostname and making it consistent throughout all your URLs.
Do you have any questions? Please let me know in the comments section below.
![How to Redirect www to non-www in WordPress? [& Vice Versa]](https://asmi.me/wp-content/uploads/2020/11/wordpress-www-redirect.jpg)


